

LinkedIn offers their official share buttons to implement on blogs and websites. LinkedIn share button let users share content on websites instantly to their LinkedIn profile directly without leaving the website. So it will help readers keep more time on your site and more convenient for readers too. As the sharing made easy for LinkedIn users, it will help you to generate more traffic to your blog from LinkedIn platform too. The content shared on LinkedIn may featured and appeared on LinkedIn homepage if they are circling around LinkedIn users. It will add more exposure to your content. Would you mind implementing LinkedIn share button for your blog posts?
Steps:
1. Go to Blogger Dashboard.
2. Click on your Blog Title.
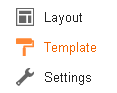
3. Navigate to Template tab.
Note: Before editing your template, you may want to save a copy of it. Read How to Back Up Your Template.
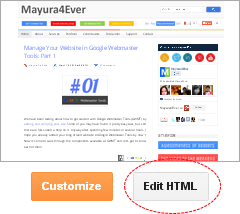
4. Click on Edit HTML button.
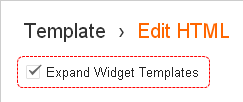
5. Now tick on, Expand Widget Templates.
6. Search for <data
 ost.body/> in template and add following code after that.
Notes:
* Adding below <data
ost.body/> will place your button under the post. If you need to place it elsewhere on post page, read How to Position Elements on a Blogger Post Page.* You may encounter two search results for <data
ost.body/>. Add this code right after the first resulted line of code.* If you see a line similar to <div style='clear: both;'/> tag right after the <data
ost.body/> tag, then you gotta place this code snippet right after the <div style='clear: both;'/>. <script src="http://platform.linkedin.com/in.js" type="text/javascript"></script>
<script type="IN/Share" expr:data-url="data
ost.url" data-counter="[Counter Mode]"></script>Color Indication Information
- LinkedIn Share Button Count Mode
There are three styles/modes available for LinkedIn share button including no counter style. Select style as you prefer and use particular count mode as the value of counterattribute.
Vertical

Count Mode: top
Horizontal
Count Mode: right
No Count
Here you don't have to specify count mode for count attribute in the code snippet. Just remove counterattribute and you will see button with no count.
7.
Now
save your template and check individual posts for LinkedIn share button.Enjoy :-)
Thanks for coming by and taking your time to read this post
 I hope you have learnt something today. Now I'd love to hear from you. Got any views, thoughts and questions related to the post? I'm all ears here. Add your comment.