


Allow the vhosts configuration from the Apache configuration file httpd.conf
Open the httpd.conf
sudo nano /etc/apache2/httpd.conf
Search for ‘vhosts‘ and uncomment the include line
# Virtual hosts
Include /private/etc/apache2/extra/httpd-vhosts.conf
Also allow another module to run by uncommenting:
LoadModule vhost_alias_module libexec/apache2/mod_vhost_alias.so
Edit the vhosts.conf file
Open this file to add in the virtual host.
sudo nano /etc/apache2/extra/httpd-vhosts.conf
An example domain in the file is given of the format required to add in additional domains, just follow this to create your new virtual host:
<VirtualHost *:80>
ServerAdmin webmaster@dummy-host2.example.com
DocumentRoot "/usr/docs/dummy-host2.example.com"
ServerName dummy-host2.example.com
ErrorLog "/private/var/log/apache2/dummy-host2.example.com-error_log"
CustomLog "/private/var/log/apache2/dummy-host2.example.com-access_log" common
</VirtualHost>
We can take this example and extend on it, if you wanted a domain named apple.com for example, you can copy the existing text block and edit to suit:
<VirtualHost *:80>
    ServerName apple.com
    ServerAlias www.apple.com
    DocumentRoot "/Users/USERNAME/Sites/apple"
    ErrorLog "/private/var/log/apache2/apple.com-error_log"
    CustomLog "/private/var/log/apache2/apple.com-access_log" common
    ServerAdmin web@coolestguidesontheplanet.com
</VirtualHost>
So in the example above a vhost for apple.com is created and the document root is in the Sites folder, in the text block above I have also added in some log files, what you need to change is the document root location username and domain name to suit your needs. Finish and save the file.
Now also you need to map the IP address to be the localhost.
Map Your IP address to localhost
sudo nano /etc/hosts
Add the Domain and ‘www‘ alias to resolve to the localhost address
127.0.0.1 apple.com www.apple.com
Restart Apache
sudo apachectl restart
Check out your local vhost domain in the browser
Losing Localhost
One caveat to note about virtual hosts is that once set up you lose your older document root previously at /LIbrary/WebServer/Documents or accessed in the browser athttp://localhost what happens is that you get a 403 Forbidden Error. But the ~/username document root is still compatible.
To get around this, you need to add in a vhost for localhost and declare this vhost before any of the others, in the same file:
sudo nano /etc/apache2/extra/httpd-vhosts.conf
Add in:
<VirtualHost *:80>
ServerName localhost
DocumentRoot /Library/WebServer/Documents/
</VirtualHost>
Restart Apache
sudo apachectl restart
Changing the WebServer Default User
One of the frustrations of using the Users/username/Sites folder for vhosts is the permissions issues with things like updates and authentication.

This is because the default webserver user which runs httpd is known as _www, which will not be the user in your local account. If your machine is only in use by you and the webserver will run only under your account then you can change the user.
Find Your User and Group
In the Terminal use the id command to see your username and group
id
You will get a bunch of user groups, you need your primary user uid and group gid names
uid=502(<mark>admin</mark>) gid=20(<mark>staff</mark>)
Change this back in /etc/apache2/httpd.conf
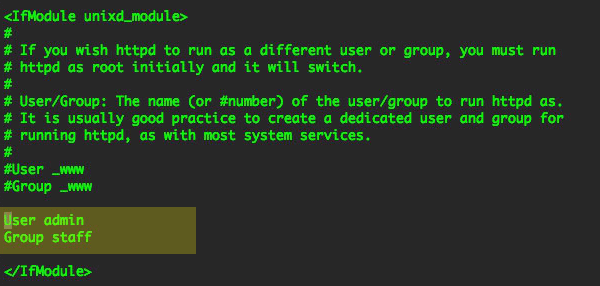
Restart Apache
sudo apachectl restart
Restart Apache and now you are running httpd as your local account.