

文本來源處:http://krypted.com/mac-security/provide-vpn-services-using-mavericks-server/


OS X Server has long had a VPN service that can be run. The server is capable of running the two most commonly used VPN protocols: PPTP and L2TP. The L2TP protocol is always in use, but the server can run both concurrently. You should use L2TP when at all possible.
Sure, “All the great themes have been used up and turned into theme parks.” But security is a theme that it never hurts to keep in the forefront of your mind. If you were thinking of exposing the other services in Mavericks Server to the Internet without having users connect to a VPN service then you should think again, because the VPN service is simple to setup and even simpler to manage.
Setting Up The VPN Service In Mavericks Server (Server 3)
To setup the VPN service, open the Server app and click on VPN in the Server app sidebar. The VPN Settings screen has two options available in the “Configure VPN for” field, which has two options:
- L2TP: Enables only the L2TP protocol
- L2TP and PPTP: Enables both the L2TP protocol and the PPTP protocol

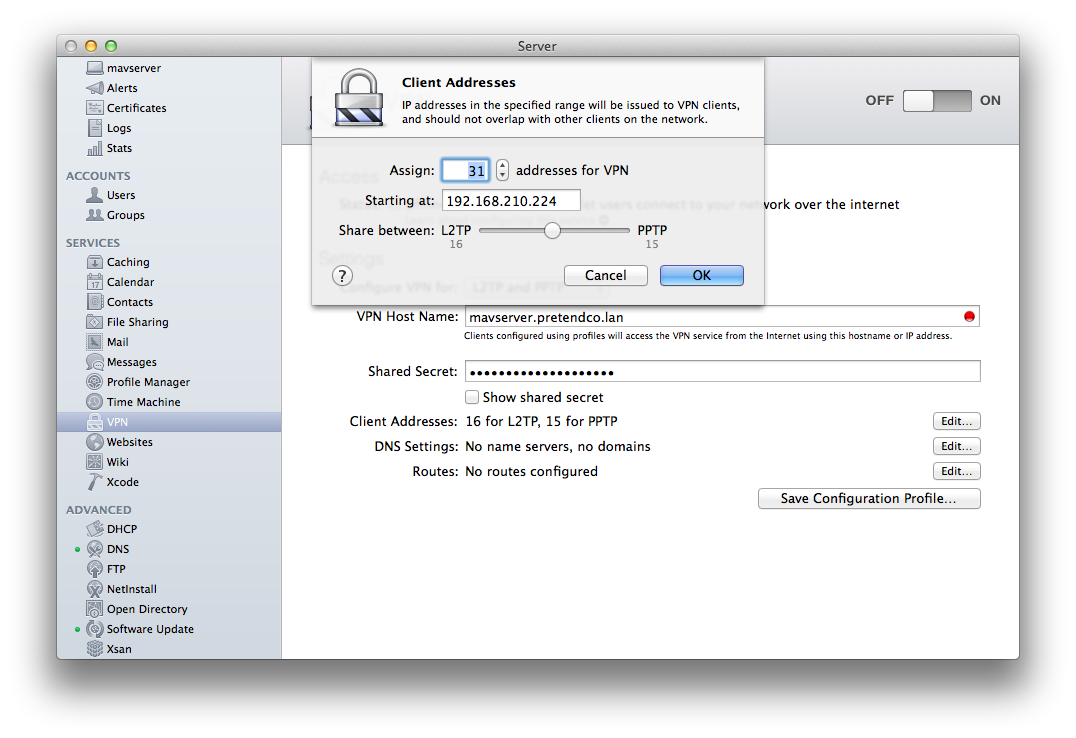
The VPN Host Name field is used by administrators leveraging profiles. The setting used becomes the address for the VPN service in the Everyone profile. L2TP requires a shared secret or an SSL certificate. In this example, we’ll configure a shared secret by providing a password in the Shared Secret field. Additionally, there are three fields, each with an Edit button that allows for configuration:
- Client Addresses: The dynamic pool of addresses provided when clients connect to the VPN
- DNS Settings: The name servers used once a VPN client has connected to the server. As well as the Search Domains configuration.

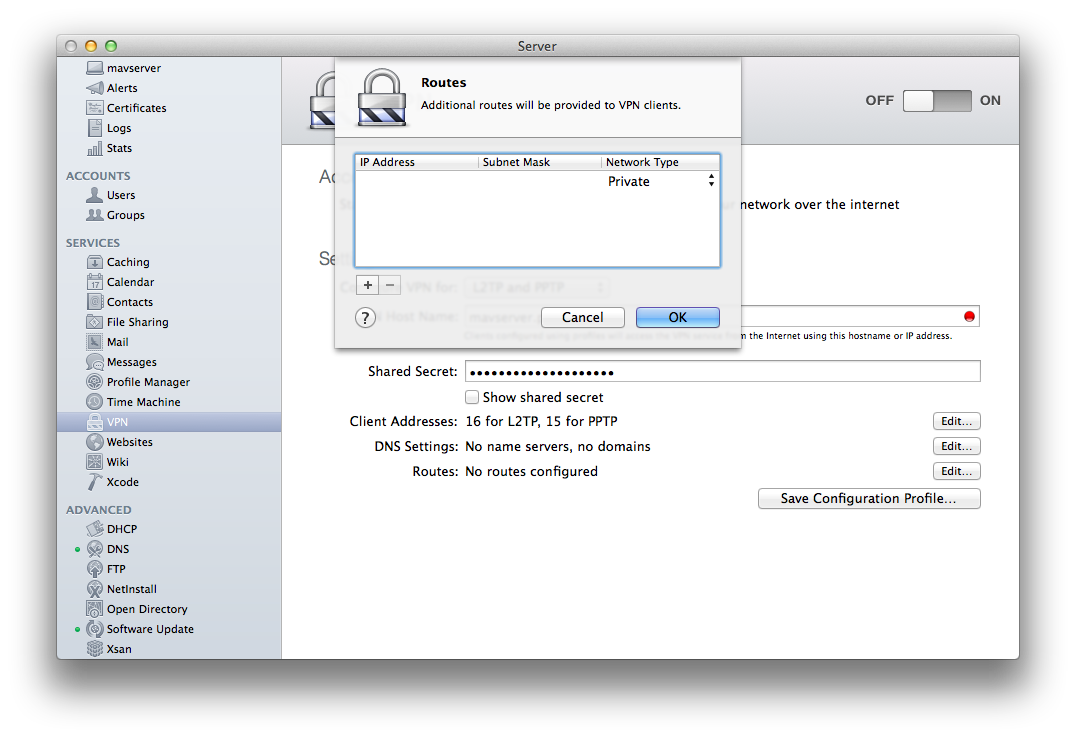
- Routes: Select which interface (VPN or default interface of the client system) that a client connects to each IP address and subnet mask over.

- Save Configuration Profile: Use this button to export configuration profiles to a file, which can then be distributed to client systems (OS X using the profiles command, iOS using Apple Configurator or both using Profile Manager).

Once configured, open incoming ports on the router/firewall. PPTP runs over port 1723. L2TP is a bit more complicated (with keys bigger than a baby’s arm), running over 1701, but also the IP-ESP protocol (IP Protocol 50). Both are configured automatically when using Apple AirPorts as gateway devices. Officially, the ports to forward are listed at http://support.apple.com/kb/TS1629.
Using The Command Line
I know, I’ve described ways to manage these services from the command line before. But, “tonight we have number twelve of one hundred things to do with your body when you’re all alone.” The serveradmin command can be used to manage the service as well as the Server app. The serveradmin command can start the service, using the default settings, with no further configuration being required:
sudo serveradmin start vpn
And to stop the service:
sudo serveradmin stop vpn
And to list the available options:
sudo serveradmin settings vpn
The output of which shows all of the VPN settings available via serveradmin (which is many more than what you see in the Server app:
vpn:vpnHost = "mavserver.pretendco.lan"
vpn:Servers:com.apple.ppp.pptp:Server:Logfile = "/var/log/ppp/vpnd.log"
vpn:Servers:com.apple.ppp.pptp:Server:VerboseLogging = 1
vpn:Servers:com.apple.ppp.pptp:Server:MaximumSessions = 128
vpn:Servers:com.apple.ppp.pptp:DNS:OfferedSearchDomains = _empty_array
vpn:Servers:com.apple.ppp.pptp:DNS:OfferedServerAddresses = _empty_array
vpn:Servers:com.apple.ppp.pptp:Radius:Servers:_array_index:0:SharedSecret = "1"
vpn:Servers:com.apple.ppp.pptp:Radius:Servers:_array_index:0:Address = "1.1.1.1"
vpn:Servers:com.apple.ppp.pptp:Radius:Servers:_array_index:1:SharedSecret = "2"
vpn:Servers:com.apple.ppp.pptp:Radius:Servers:_array_index:1:Address = "2.2.2.2"
vpn:Servers:com.apple.ppp.pptp:enabled = yes
vpn:Servers:com.apple.ppp.pptp:Interface:SubType = "PPTP"
vpn:Servers:com.apple.ppp.pptp:Interface:Type = "PPP"
vpn:Servers:com.apple.ppp.pptp:PPP:LCPEchoFailure = 5
vpn:Servers:com.apple.ppp.pptp:PPP:DisconnectOnIdle = 1
vpn:Servers:com.apple.ppp.pptp:PPP:AuthenticatorEAPPlugins:_array_index:0 = "EAP-RSA"
vpn:Servers:com.apple.ppp.pptp:PPP:AuthenticatorACLPlugins:_array_index:0 = "DSACL"
vpn:Servers:com.apple.ppp.pptp:PPP:CCPEnabled = 1
vpn:Servers:com.apple.ppp.pptp:PPP:IPCPCompressionVJ = 0
vpn:Servers:com.apple.ppp.pptp:PPP:ACSPEnabled = 1
vpn:Servers:com.apple.ppp.pptp:PPP:LCPEchoEnabled = 1
vpn:Servers:com.apple.ppp.pptp:PPP:LCPEchoInterval = 60
vpn:Servers:com.apple.ppp.pptp:PPP:MPPEKeySize128 = 1
vpn:Servers:com.apple.ppp.pptp:PPP:AuthenticatorProtocol:_array_index:0 = "MSCHAP2"
vpn:Servers:com.apple.ppp.pptp:PPP:MPPEKeySize40 = 0
vpn:Servers:com.apple.ppp.pptp:PPP:AuthenticatorPlugins:_array_index:0 = "DSAuth"
vpn:Servers:com.apple.ppp.pptp:PPP:Logfile = "/var/log/ppp/vpnd.log"
vpn:Servers:com.apple.ppp.pptp:PPP:VerboseLogging = 1
vpn:Servers:com.apple.ppp.pptp:PPP:DisconnectOnIdleTimer = 7200
vpn:Servers:com.apple.ppp.pptp:PPP:CCPProtocols:_array_index:0 = "MPPE"
vpn:Servers:com.apple.ppp.pptp:IPv4:ConfigMethod = "Manual"
vpn:Servers:com.apple.ppp.pptp:IPv4:DestAddressRanges:_array_index:0 = "192.168.210.240"
vpn:Servers:com.apple.ppp.pptp:IPv4:DestAddressRanges:_array_index:1 = "192.168.210.254"
vpn:Servers:com.apple.ppp.pptp:IPv4:OfferedRouteAddresses = _empty_array
vpn:Servers:com.apple.ppp.pptp:IPv4:OfferedRouteTypes = _empty_array
vpn:Servers:com.apple.ppp.pptp:IPv4:OfferedRouteMasks = _empty_array
vpn:Servers:com.apple.ppp.l2tp:Server:LoadBalancingAddress = "1.2.3.4"
vpn:Servers:com.apple.ppp.l2tp:Server:MaximumSessions = 128
vpn:Servers:com.apple.ppp.l2tp:Server:LoadBalancingEnabled = 0
vpn:Servers:com.apple.ppp.l2tp:Server:Logfile = "/var/log/ppp/vpnd.log"
vpn:Servers:com.apple.ppp.l2tp:Server:VerboseLogging = 1
vpn:Servers:com.apple.ppp.l2tp:DNS:OfferedSearchDomains = _empty_array
vpn:Servers:com.apple.ppp.l2tp:DNS:OfferedServerAddresses = _empty_array
vpn:Servers:com.apple.ppp.l2tp:Radius:Servers:_array_index:0:SharedSecret = "1"
vpn:Servers:com.apple.ppp.l2tp:Radius:Servers:_array_index:0:Address = "1.1.1.1"
vpn:Servers:com.apple.ppp.l2tp:Radius:Servers:_array_index:1:SharedSecret = "2"
vpn:Servers:com.apple.ppp.l2tp:Radius:Servers:_array_index:1:Address = "2.2.2.2"
vpn:Servers:com.apple.ppp.l2tp:enabled = yes
vpn:Servers:com.apple.ppp.l2tp:Interface:SubType = "L2TP"
vpn:Servers:com.apple.ppp.l2tp:Interface:Type = "PPP"
vpn:Servers:com.apple.ppp.l2tp:PPP:LCPEchoFailure = 5
vpn:Servers:com.apple.ppp.l2tp:PPP:DisconnectOnIdle = 1
vpn:Servers:com.apple.ppp.l2tp:PPP:AuthenticatorEAPPlugins:_array_index:0 = "EAP-KRB"
vpn:Servers:com.apple.ppp.l2tp:PPP:AuthenticatorACLPlugins:_array_index:0 = "DSACL"
vpn:Servers:com.apple.ppp.l2tp:PPP:VerboseLogging = 1
vpn:Servers:com.apple.ppp.l2tp:PPP:IPCPCompressionVJ = 0
vpn:Servers:com.apple.ppp.l2tp:PPP:ACSPEnabled = 1
vpn:Servers:com.apple.ppp.l2tp:PPP:LCPEchoInterval = 60
vpn:Servers:com.apple.ppp.l2tp:PPP:LCPEchoEnabled = 1
vpn:Servers:com.apple.ppp.l2tp:PPP:AuthenticatorProtocol:_array_index:0 = "MSCHAP2"
vpn:Servers:com.apple.ppp.l2tp:PPP:AuthenticatorPlugins:_array_index:0 = "DSAuth"
vpn:Servers:com.apple.ppp.l2tp:PPP:Logfile = "/var/log/ppp/vpnd.log"
vpn:Servers:com.apple.ppp.l2tp:PPP:DisconnectOnIdleTimer = 7200
vpn:Servers:com.apple.ppp.l2tp:IPSec:SharedSecretEncryption = "Keychain"
vpn:Servers:com.apple.ppp.l2tp:IPSec:LocalIdentifier = ""
vpn:Servers:com.apple.ppp.l2tp:IPSec:SharedSecret = "com.apple.ppp.l2tp"
vpn:Servers:com.apple.ppp.l2tp:IPSec:AuthenticationMethod = "SharedSecret"
vpn:Servers:com.apple.ppp.l2tp:IPSec:RemoteIdentifier = ""
vpn:Servers:com.apple.ppp.l2tp:IPSec:IdentifierVerification = "None"
vpn:Servers:com.apple.ppp.l2tp:IPSec:LocalCertificate = <>
vpn:Servers:com.apple.ppp.l2tp:IPv4:ConfigMethod = "Manual"
vpn:Servers:com.apple.ppp.l2tp:IPv4:DestAddressRanges:_array_index:0 = "192.168.210.224"
vpn:Servers:com.apple.ppp.l2tp:IPv4:DestAddressRanges:_array_index:1 = "192.168.210.239"
vpn:Servers:com.apple.ppp.l2tp:IPv4:OfferedRouteAddresses = _empty_array
vpn:Servers:com.apple.ppp.l2tp:IPv4:OfferedRouteTypes = _empty_array
vpn:Servers:com.apple.ppp.l2tp:IPv4:OfferedRouteMasks = _empty_array
vpn:Servers:com.apple.ppp.l2tp:L2TP:Transport = "IPSec"
vpn:Servers:com.apple.ppp.l2tp:L2TP:IPSecSharedSecretValue = "yaright"
To disable L2TP, set vpn:Servers:com.apple.ppp.l2tp:enabled to no:
sudo serveradmin settings vpn:Servers:com.apple.ppp.l2tp:enabled = no
To configure how long a client can be idle prior to being disconnected:
sudo serveradmin settings vpn:Servers:com.apple.ppp.l2tp:PPP:DisconnectOnIdle = 10
By default, each protocol has a maximum of 128 sessions, configureable using vpn:Servers:com.apple.ppp.pptp:Server:MaximumSessions:
sudo serveradmin settings vpn:Servers:com.apple.ppp.pptp:Server:MaximumSessions = 200
To see the state of the service, the pid, the time the service was configured, the path to the log files, the number of clients and other information, use the fullstatus option:
sudo serveradmin fullstatus vpn
Which returns output similar to the following:
vpn:servicePortsAreRestricted = "NO"
vpn:readWriteSettingsVersion = 1
vpn:servers:com.apple.ppp.pptp:AuthenticationProtocol = "MSCHAP2"
vpn:servers:com.apple.ppp.pptp:CurrentConnections = 0
vpn:servers:com.apple.ppp.pptp:enabled = yes
vpn:servers:com.apple.ppp.pptp:MPPEKeySize = "MPPEKeySize128"
vpn:servers:com.apple.ppp.pptp:Type = "PPP"
vpn:servers:com.apple.ppp.pptp:SubType = "PPTP"
vpn:servers:com.apple.ppp.pptp:AuthenticatorPlugins = "DSAuth"
vpn:servers:com.apple.ppp.l2tp:AuthenticationProtocol = "MSCHAP2"
vpn:servers:com.apple.ppp.l2tp:Type = "PPP"
vpn:servers:com.apple.ppp.l2tp:enabled = yes
vpn:servers:com.apple.ppp.l2tp:CurrentConnections = 0
vpn:servers:com.apple.ppp.l2tp:SubType = "L2TP"
vpn:servers:com.apple.ppp.l2tp:AuthenticatorPlugins = "DSAuth"
vpn:servicePortsRestrictionInfo = _empty_array
vpn:health = _empty_dictionary
vpn:logPaths:vpnLog = "/var/log/ppp/vpnd.log"
vpn:configured = yes
vpn:state = "STOPPED"
vpn:setStateVersion = 1
Security folk will be stoked to see that the shared secret is shown in the clear using:
vpn:Servers:com.apple.ppp.l2tp:L2TP:IPSecSharedSecretValue = "a dirty thought in a nice clean mind"
Configuring Users For VPN Access
Each account that accesses the VPN server needs a valid account to do so. To configure existing users to use the service, click on Users in the Server app sidebar.

At the list of users, click on a user and then click on the cog wheel icon, selecting Edit Access to Services.

At the Service Access screen will be a list of services that could be hosted on the server; verify the checkbox for VPN is highlighted for the user.

Setting Up Client Computers
As you can see, configuring the VPN service in Mavericks Server (OS X Server 2.2) is a simple and straight-forward process – much easier than eating your cereal with a fork and doing your homework in the dark.. Configuring clients is as simple as importing the profile generated by the service. However, you can also configure clients manually. To do so in OS X, open the Network System Preference pane. From here, click on the plus sign (“+”) to add a new network service.

At the prompt, select VPN in the Interface field and then either PPTP or L2TP over IPSec in the VPN Type. Then provide a name for the connection in the Service Name field and click on Create.

At the list of network interfaces in the Network System Preference pane, provide the hostname or address of the server in the Server Address field and the username that will be connecting to the VPN service in the Account Name field. If using L2TP, click on Authentication Settings.

At the prompt, provide the password entered into the Shared Secret field earlier in this article in the Machine Authentication Shared Secret field and the user’s password in the User Authentication Password field. When you’re done, click OK and then provided you’re outside the network and routeable to the server, click on Connect to test the connection.
Conclusion
Setting Up the VPN service in OS X Mavericks Server is as simple as clicking the ON button. But much more information about using a VPN can be required. The natd binary is still built into Mavericks at /usr/sbin/natd and can be managed in a number of ways. But it’s likely that the days of using an OS X Server as a gateway device are over, if they ever started. Sure “feeling screwed up at a screwed up time in a screwed up place does not necessarily make you screwed up” but using an OS X Server for NAT when it isn’t even supported any more probably does. So rather than try to use the server as both, use a 3rd party firewall like most everyone else and then use the server as a VPN appliance. Hopefully it can do much more than just that to help justify the cost. And if you’re using an Apple AirPort as a router (hopefully in a very small environment) then the whole process of setting this thing up should be super-simple.